


We need a sensor that responds to changes in light intensity in its area in order to automate devices whose operation is dependent on the light in the surrounding area. Such devices are known as light-dependent devices, and the sensor that controls them is known as a photoresistor. The term “light detecting resistor” also refers to the sensor’s workings. As a result, the photoresistor and Arduino Uno have been used to demonstrate how to control the LED in this article. The use of a photoresistor is important because it can control lights and other light-dependent devices without human intervention and help save electricity.
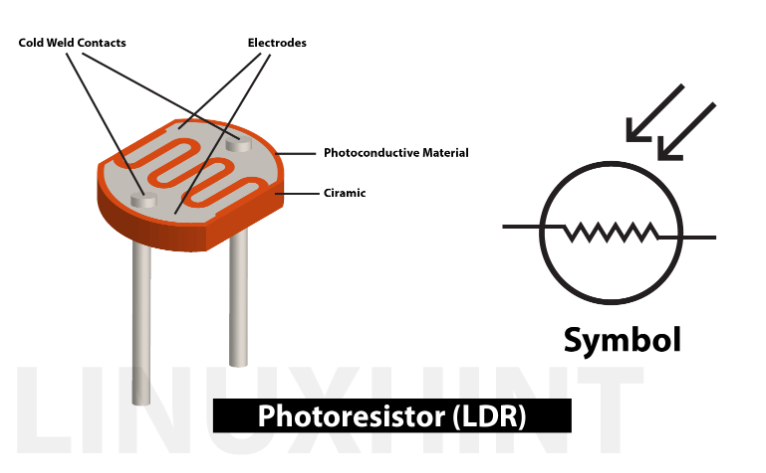
What is a photoresistor?
We can deduce from its name that it is also a type of resistor whose resistance values change in response to changes in the surrounding light intensity.
How does a photoresistor work?
The photoresistor is a type of semiconductor device in which the electrons in the valence shell break their bonds and become free electrons as light intensity increases. As a result, holes form, allowing electricity to flow through the device. Normally, there is no current flowing when the intensity of the light is low because the resistor has a high resistance.
However, the photoresistor functions because as the light intensity rises, current begins to flow, decreasing the resistance.

How to control the LED using photoresistor (LDR) with Arduino
A photoresistor makes it easy to control the lights; all we need to do is set the threshold value in the microcontroller code that will cause the LED to turn on and off. Making automatic street lights that automatically turn on after sunset and off when the sun rises is a practical application of a photoresistor.
Therefore, in order to make LED operation dependent on light intensity, the following components will be required:
After listing the components, we designed the circuit that will control the LED with a photoresistor. The circuit schematic is shown in the image below: Breadboard 2 220-Ohm resistors Arduino Uno Connecting wires 1 LED

How to create hardware assembly for controlling LED using photoresistor (LDR) with Arduino Uno
Before we can put the circuit into action on the hardware, we need to define the hardware assembly in the image below:

Using the blue wire, we have connected the photoresistor to the analog pin A0 of the Arduino Uno in order to control the LED. In contrast, the LED was connected using the brown wire on the digital pin 5 of the Arduino Uno.
The 5-volts and ground pins of the Arduino Uno were used to connect the photoresistor to the supply.
Arduino code for controlling the LED using photoresistor (LDR) with Arduino uno
To control the LED automatically we have to program the microcontroller first using the Arduino IDE and the Arduino code is given below: