The majority of electronic projects require a push-button component. Adding user interaction to your project is a simple and useful component. You’ve probably all used a push button at some point in your lives. A television remote, for instance, has pushbuttons for adjusting the volume and channels.
I’ll show you how to use an Arduino push button in this tutorial. I have utilized a few LEDs to show the result of the buttons. I will change the blinking LED’s frequency and brightness using the button.
Push Button Overview
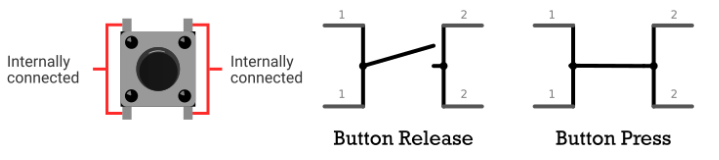
There are many different sizes and shapes of push buttons. However, the majority of pushbuttons share a similar internal structure and principle of operation.
Most pushbuttons have four pins. However, these pins are internally connected in pairs. Therefore, you actually have two connections. These two terminals will connect when you press the button. Additionally, these terminals will disconnect when you release the button.
How to Connect a Push Button with Arduino
It’s easy to connect a push button to an Arduino. Connect one of the push button’s terminals to any Arduino digital pins and the ground pin. When you are not pressing the button, you will need to use a pull-up resistor (10k ) to keep the voltage HIGH.
The pullup resistor is only a high-esteem resistor interfacing with the Arduino computerized pin you are utilizing with the HIGH (5v) voltage. Find out about the pullup resistor here – Arduino pullup Resistor
Take note of the fact that the button input pin receives a logic HIGH input when you are not pressing the button in a pull-up configuration. Additionally, it receives logic LOW input when you press the button.
Arduino Push Button Code
There are two modes for a push button: HIGH and LOW. Therefore, you can read the state of the button using the digitalRead() function. I’m using a pullup resistor here. This indicates that when the button is pressed, its output changes from HIGH to LOW.
There are three common uses for push buttons: 1) button state detection 2) button state change detection 3) button press count If you want a LED to turn on when the button is pressed and off when it is not pressed, you must only detect the button state.
You must detect the change in state of the button in order to toggle the LED between ON and OFF with each button press.
Additionally, you will need to count the number of button presses if you want to control multiple leds with a single button, change the brightness of an LED, or both.
I will use different examples from each of the three cases in the sections that follow.
Button Press Detection
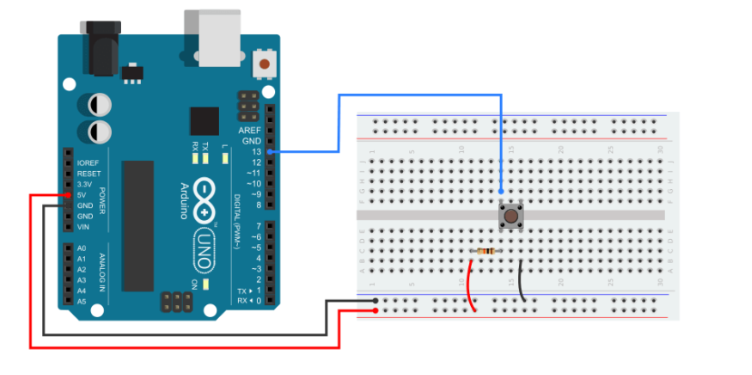
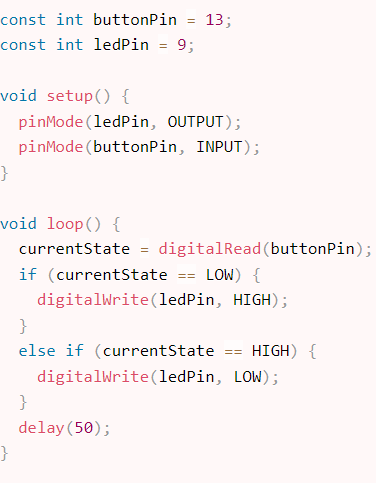
I’ll show you how to determine the button’s state in this section. I will utilize a Prompted show the result. When you press the button, the LED will come on, and it will stay on as long as you hold the button. When you press and release the button, the LED will go out.
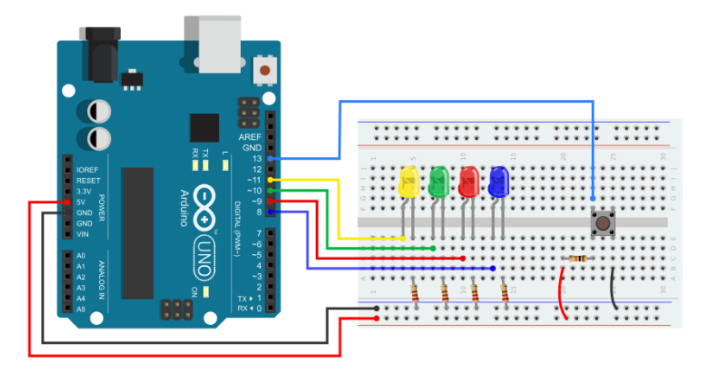
You need to make a small circuit like the one below for this example. As you can see, I used the Arduino to connect a button and an LED. A 220 current-limiting resistor connects the LED’s +ve pin to Arduino pin number 9 and the ground pin to the ground. The button is connected to pin 13 on the Arduino.
Arduino Code
Button State Change Detection
I will demonstrate to you how to detect the state change of a push button in this section. The moment when the button output changes from HIGH to LOW is detected by the code below. This indicates that it will only detect the button being pressed, not released. That event can be used to control a lot of things.
The previous circuit will work with this example. Therefore, there is no need to alter the circuit. Simply upload the code below, press the button multiple times, and test its functionality.
The underneath code will flip a Drove each time the button is squeezed.
Arduino Push Button Counter
Counting the number of button presses is required in some projects. For instance, if you want to change the speed of a motor with a button input or if you want to increase or decrease the brightness of an LED step by step.
I will demonstrate how to count the number of button presses in this section. The code below will count from 0 to 10 the number of button presses and then reset the counter. The output can be seen on the Arduino serial monitor. The push-button counter is put to good use in the following sections.
Driving Multiple LEDs using Push Button
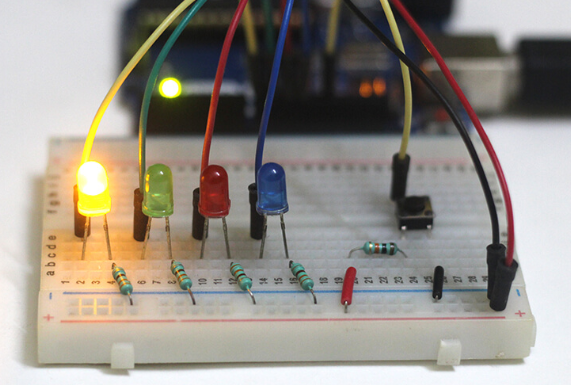
In this section, I will control four LEDs with a push button. When you press the button, a different LED will come on, and all of the other LEDs will go out.
You will need a small circuit like the one below for this example. The Arduino board must be connected to four LEDs and a button. You can use the following circuit: Connect four LEDs’ +ve pins to the Arduino pins 8, 9, 10, and 11. Through a resistor that limits the current, connect their -ve pin to ground (220). Each LED requires its own resistor. Now, connect a button to pin 13 on the Arduino.
Control The Brightness of an LED using Buttons
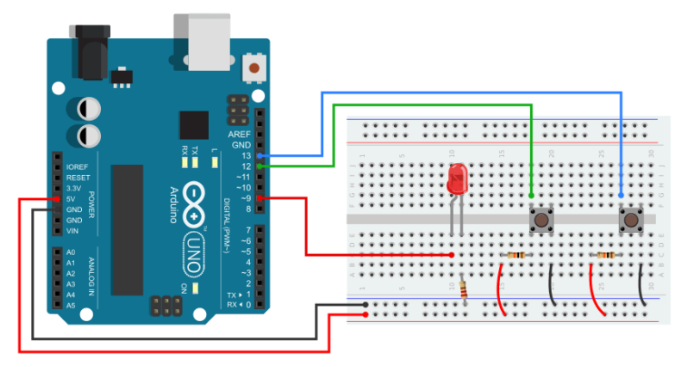
In this section, I will control an LED’s brightness with two buttons. The LED’s brightness can be increased or decreased by pressing a single button.
You need to create a small circuit here, like the one below. Connect the two input buttons to pins 12 and 13 of the Arduino. Using a current-limiting resistor (220), connect the LED’s +ve pin to Arduino pin 9 and the -ve pin to the ground.